vMotion Interesting Behaviour

Introduction

I’ve been doing some migration work for the last few weeks and found an interesting behaviour of vMotion that I would like to share with you.

Migration Scenario

The migration work was quite simple, just had to vMotion a few virtual machines from a cluster to another due to SQL licensing.

The end-users wanted the migration to happen live but they were OK with a few packets loss.

As there were shared storage available, it’s been decided to use vMotion + storage vMotion.

Infrastructure

The following is how the vSphere infrastructure was setup for the migration:

  1. Two clusters
    • Source_Cluster
    • Destination_Cluster
  2. 4 x 5.5 ESXi servers per cluster
    • 2 x 10Gbe network uplinks
  3. Management and vMotion VMKernels in different subnet
  4. Different dvSwitches for clusters
    • All 8 ESXi servers in source and destination clusters were with active/active on the physical interfaces, i.e. No LAG.
  5. Shared storage between clusters were available

Pre-requisites

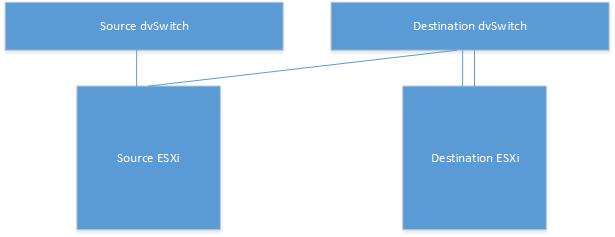
There was only one element needed to be prepared for the migration, shared dvSwitch between clusters. Just like last time (the blog can be found here), it’s been decided to pull one uplink out from source ESXi server which will be used for the migration.  Here after, I will call ESXi_Source_Migration and ESXi_Destination_Migration for the ESXi servers purposed for migration. The following is how it looked like:

vMotion1

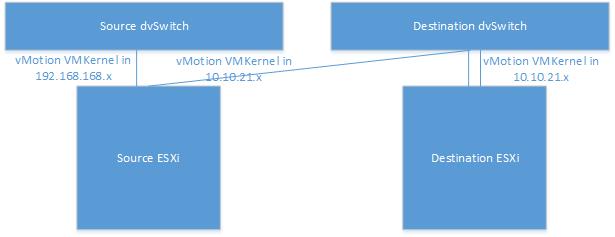
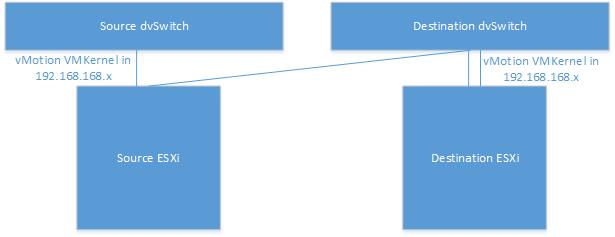
Then the problem was that the vMotion VMKernels were in different subnet:

  1. Source_Cluster => 192.168.168.x/24
    • No Gateway, layer 2 network
  2. Destination_Cluster => 10.10.21.x/24
    • No Gateway, layer 2 network

After a discussion, it’s been decided to add one more vMotion VMKernel to ESXi_Source_Migration with the subnet 10.10.21.x so that the vMotion could happen between the source ESXi servers using 192.168.168.x subnet and between ESXi_Source_Migration and ESXi_Destination_Migration using 10.10.21.x subnet. Figure is attached below:

vMotion2

Result 

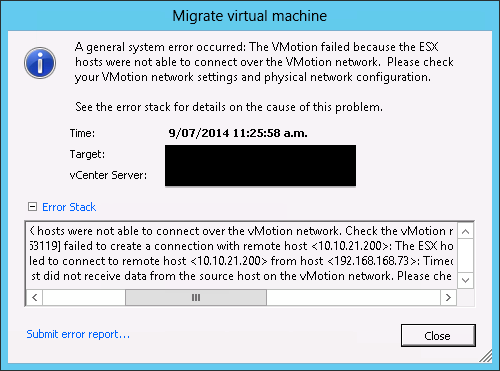
The first virtual machine tried to migrate was not in ESXi_Source_Migration hence it’s been vMotioned to this ESXi server and vMotion was successful. Then I kicked off the migration to ESXi_Destination_Migration. After a few minutes, the process was stuck at 14% and eventually failed saying 192.168.168.x VMKernel cannot talk to 10.10.21.x VMKernel. Error is attached below:

Screen Shot 2014-07-09 at 11.29.00 am

What I thought was that when a virtual machine was being migrated from ESXi_Source_Migration to ESXi_Destination_Migration, it should have been using vMotion VMKernel in 10.10.21.x subnet so that it can talk to the destination.

The quick fix was to remove 192.168.168.x vMotion VMKernel from the source ESXi server and it worked.

After the migration’s finished, added 192.168.168.x VMKernel back to the source ESXi server and was about to start the second virtual machine. It was also located in different ESXi server in source cluster so I vMotioned it to ESXi_Source_Migration. Interesting thing happened, it failed. The vMotion in the same cluster wasn’t successful saying the following:

Screen Shot 2014-07-09 at 11.51.24 am

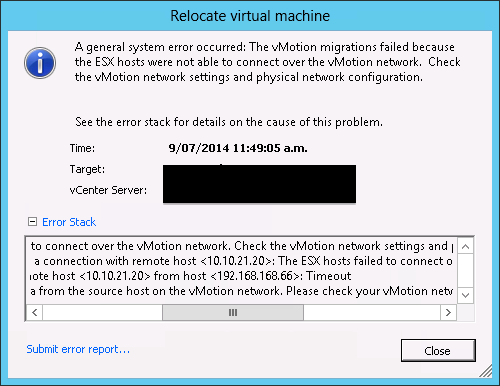
10.10.21.x VMKernel was being used, not 192.168.168.x. Here again, 10.10.21.x VMKernel was removed which allowed the vMotion to be accomplished.

Summarising the result above:

  1. First virtual machine was vMotioned to ESXi_Source_Migration (successful)
  2. Performed vMotion + storage vMotion to ESXi_Destination_Migration (failed)
    • Removing 192.168.168.x vMotion VMKernel fixed the issue
  3. After the migration, added 192.168.168.x vMotion VMKernel back to ESXi_Source_Migration
  4. Tried to vMotion second virtual machine within the cluster to ESXi_Source_Migration (failed)
    • Removing 10.10.21.x vMotion VMKernel fixed the issue

With the result above, it’s could be concluded that vMotion uses only one vMotion VMKernel and the latest one that was active before.

Workdaround

Since removing/adding vMotion VMKernels wasn’t an ideal process, it’s been decided to change the destination vMotion VMKernels in 192.168.168.x subnet.

vMotion3

After modification, inter/intra cluster vMotion worked fine.

Wrap-Up

Even though it’s possible to add multiple vMotion VMKernels, apparently it’s not supported in this situation. Probably this is something VMware could improve in future to support this.

For now, using the vMotion VMKernels in the same subnet would be the best & easiest option.

ESXi Custom Firewall Rule – Automation using Powercli and PLINK

Introduction

It’s been a long time using Nagios to monitor our vSphere infrastructure and found the new plug-in we’ve upgraded requires a custom firewall rule to be opened on ESXi servers to monitor NTP status. By default, when NTP is enabled, outgoing port 123 in UDP is opened but Nagios required incoming port 123 in UDP to connect to ESXi and check for the NTP status.

As there are hundreds of ESXi servers to configure, decided to write a script to automate the process.

There is an excellent blog by William Lam that goes through how to create a custom firewall rule and it can be found here. Please make sure you read this blog before going through this post.

Pre-requisites

  1. SSH is enabled across all ESXi servers
  2. VMFS volumes are shared across ESXi servers in a cluster
  3. Download plink.exe , it can be found here
  4. Create a custom firewall XML file, follow William’s post
  5. Create an input .csv file, detail will be explained below
  6. Locate above files in the same directory as the script

ntpd.xml

The following is the XML file I used for creating a custom firewall rule. The bold and underline, “ntpd” is the name of the custom rule which will be shown under Security Profile. Change the name that fits your naming convention.

<ConfigRoot>
  <service>
    <id>ntpd</id>
    <rule id='0000'>
      <direction>inbound</direction>
      <protocol>udp</protocol>
      <porttype>dst</porttype>
      <port>123</port>
    </rule>
    <enabled>true</enabled>
    <required>false</required>
  </service>
</ConfigRoot>

Input

PLINK is required to copy the .xml file to /etc/vmware/firewall folder. To do this, it is a must to provide root password. In our case, each cluster has different root password so I’ve decided to create an input file like the following:

cluster,password
cluster_1,123456
cluster_2,123457
cluster_3,123458
...
...

Script

The following is the script I wrote. It’s a simple script that does:

  • Import the password.csv file
  • For each cluster:
    • Find the datastore that has the largest freespace
    • Copy the .xml file to the datastore found above
    • For each ESXi server:
      • Check if the inbound port 123 is already opened
      • If it’s opened, skip this ESXi server
      • If not, copy the .xml file from the datastore above to /etc/vmware/firewall directory via PLINK
      • Refresh the firewall rule using esxcli network firewall refresh
      • Present the result
$input = Import-Csv C:\script\input\password.csv

foreach ($cluster in (Get-Cluster | sort Name)) {
  $datacenter = Get-Datacenter -Cluster $cluster | %{$_.Name}
  $datastore = (Get-VMHost -Location $cluster | Get-Datastore | Sort-Object FreespaceGB -Descending)[0]
  Write-Host "Copying ntpd.xml file to $datastore"
  Write-Host ""
  Copy-DatastoreItem "ntpd.xml" -Destination "vmstore:\$datacenter\$datastore" 

  foreach ($esxi in (Get-VMHost -Location $cluster | Sort Name)) { 
    $esxcli = Get-Esxcli -VMHost $esxi
    $ntp_rule = $esxcli.network.firewall.ruleset.rule.list() | where {$_.PortBegin -eq 123 -and $_.PortEnd -eq 123 -and $_.Direction -eq "Inbound"}
    if ($ntp_rule) { 
      Write-Warning "$esxi already has inbound NTP Daemon running"
      Write-Host ""
    } else {
      $password = $input | where {$_.cluster -match $cluster.Name} | %{$_.password}
      echo y | .\plink.exe -pw $password "root@$esxi" "cp /vmfs/volumes/$datastore/ntpd.xml /etc/vmware/firewall;"

      Write-Host "Refreshing Firewall Rule"
      $esxcli.network.firewall.refresh()
      Write-Host ""

      Write-Host "The modification is made, printed below"
      $esxcli.network.firewall.ruleset.rule.list() | where {$_.PortBegin -eq 123 -and $_.PortEnd -eq 123}
    }   
  }
}

Wrap-Up

One of the constraints I can think of is enabling SSH on ESXi servers as it’s not recommended by VMware. I was thinking of automating the process without using SSH but couldn’t find any other ways of doing it. Please ping me if any one of you finds a way.

Assuming SSH is disabled and trying to get an approval to open the port using the script above, I would suggest you to:

  1. Work on one cluster at a time
  2. Enable SSH just after the foreach ESXi loop and disable at the end of the loop

In this way, SSH will only be enabled for one ESXi server at a time.

Hope this helps.


Power On Virtual Machine Fails – VMFS Heapsize

Introduction

Several days before, an incident was assigned to me saying the end-user could not power on one of his virtual machines. Tried to power it on and an error message popped up, however, the message was not really helpful. All it said is “A general system error occurred: The virtual machine could not start”.

Symptom

As described in introduction, the error message was not telling me what the problem is. A figure is attached below.

Screen Shot 2014-06-30 at 11.29.12 am

Next thing I looked into was the vmware.log and found that there was an issue with creating swapfile.

vmware.log
2014-06-29T22:27:18.702Z| vmx| CreateVM: Swap: generating normal swap file name.
2014-06-29T22:27:18.704Z| vmx| Swap file path: '/vmfs/volumes/521439a7-bd74efb3-d915-d4ae52a522bf/aaa/aaa-aa1fa36d.vswp'
2014-06-29T22:27:18.704Z| vmx| VMXVmdb_GetDigestDiskCount: numDigestDisks = 0
2014-06-29T22:27:18.705Z| vmx| Msg_Post: Error
2014-06-29T22:27:18.705Z| vmx| [msg.dictionary.writefile.truncate] An error occurred while truncating configuration file "/vmfs/volumes/521439a7-bd74efb3-d915-d4ae52a522bf/aaa/aaa.vmx":Cannot allocate memory.
2014-06-29T22:27:18.705Z| vmx| [vob.heap.grow.max.reached] Heap vmfs3 already at its maximum size of 83887056. Cannot expand.
2014-06-29T22:27:18.705Z| vmx| [vob.heap.grow.max.reached] Heap vmfs3 already at its maximum size of 83887056. Cannot expand.             2014-06-29T22:27:18.705Z| vmx| [vob.swap.poweron.createfailure.status] Failed to create swap file '/vmfs/volumes/521439a7-bd74efb3-d915-d4ae52a522bf/shrwebprd02/shrwebprd02-aa1fa36d.vswp' : Out of memory
2014-06-29T22:27:18.705Z| vmx| [msg.vmmonVMK.creatVMFailed] Could not power on VM : Out of 
2014-06-29T22:27:18.705Z| vmx| [msg.monitorLoop.createVMFailed.vmk] Failed to power on VM.                                                2014-06-29T22:27:18.705Z| vmx| ----------------------------------------                                                                   2014-06-29T22:27:18.838Z| vmx| Module MonitorLoop power on failed.                                                                        2014-06-29T22:27:18.838Z| vmx| VMX_PowerOn: ModuleTable_PowerOn = 0                                                                       2014-06-29T22:27:18.840Z| vmx| Vix: [28466190 mainDispatch.c:4084]: VMAutomation_ReportPowerOpFinished: statevar=1, newAppState=1873, success=1 additionalError=0
2014-06-29T22:27:18.840Z| vmx| Vix: [28466190 mainDispatch.c:4103]: VMAutomation: Ignoring ReportPowerOpFinished because the VMX is shutting down.              
2014-06-29T22:27:18.840Z| vmx| Vix: [28466190 mainDispatch.c:4084]: VMAutomation_ReportPowerOpFinished: statevar=0, newAppState=1870, success=1 additionalError=0
2014-06-29T22:27:18.840Z| vmx| Vix: [28466190 mainDispatch.c:4103]: VMAutomation: Ignoring ReportPowerOpFinished because the VMX is shutting down.              
2014-06-29T22:27:18.840Z| vmx| Transitioned vmx/execState/val to poweredOff                                                               2014-06-29T22:27:18.842Z| vmx| Vix: [28466190 mainDispatch.c:4084]: VMAutomation_ReportPowerOpFinished: statevar=0, newAppState=1870, success=0 additionalError=0
2014-06-29T22:27:18.842Z| vmx| Vix: [28466190 mainDispatch.c:4103]: VMAutomation: Ignoring ReportPowerOpFinished because the VMX is shutting down.
2014-06-29T22:27:18.842Z| vmx| VMX idle exit

To summarise the log above:

  1. The ESXi server tried to create a swapfile for this virtual machine to power on
  2. There was an error while creating swapfile due to VMFS3 HeapSize is already at its maximum size
  3. Failed to power-on this virtual machine
To understand this issue, it’s required to go through VMFS HeapSize.

VMFS HeapSize

The ESXi server in this environment is 5.0 with Update 1. As per the KB article, the default allowed active VMDK storage per ESXi is 8TB with the default heap size 80MB. This means that if a single ESXi server has virtual machines with more than 8TB of active VMDKs, the ESXi will refuse to power-on more virtual machines.

To check how much VMDK the ESXi server has, I ran a simple PowerCLI script to check. The script and output is attached below:

foreach ($esxi in (Get-Cluster -Name “Name of Cluster” | Get-VMHost | Sort Name)) { 
  $esxi | select Name, @{N="Sum";E={ ($esxi | Get-VM | Get-HardDisk | %{$_.CapacityGB} | Measure-Object -Sum).Sum }}
}
Name,Sum                            
ESXiA,3335.7681760788
ESXiB,3035.02425670624
ESXiC,3942.765625
ESXiD,4861
ESXiE,4538.28125
ESXiF,16272.9050750732

ESXi A to E look good but F, it’s using approximately 16TB. Checked the history of virtual machine where it was running previously and yes, it was in ESXiF.

One thing to note is that it doesn’t necessarily mean that ESXiF has 16TB of active VMDK, it could be much lesser than 16TB. However, there is a high chance of exceeding 8TB and it happened to this specific virtual machine.

Solution

The solution is quite simple, vMotioned the virtual machine to ESXiB which has the lowest VMDK size and it was happy.

Ultimately, you will want to upgrade ESXi servers to 5.5 that improved VMFS HeapSize. There is an excellent article by Cormac Horgan explaining the enhancement.

Hope this helps.