vRO – Convert CSV String Input to Multidimensional Array

Introduction

I’ve been playing around with workflow scripts and one thing popped in my mind that might be useful in future was to parse a CSV from 3rd party source into vRO workflow and utilise it. Created a simple CSV file, parsed to vRO and I realised that it becomes a pure string.

In this blog post, I will be attaching and a script that converts CSV string input into multidimensional array and in the end, I will be going through some of the use cases.

Walk-through

In this example, what I will be presenting is:
  1. Use SSH workflow to get a CSV file from remote linux server and parse the CSV file as an attribute
  2. Pass above attribute to a scriptable task, convert it to a multidimensional array
  3. Utilise it

Let’s get started!

1. First of all, create a workflow, I called it “Convert CSV String Input to Hash Table”.

2. Edit the workflow, navigate to General tab and create attributes as per below. It may differ based on how you want to parse a CSV file from external source. In this case, I used a cat command to simply output a CSV file.

3

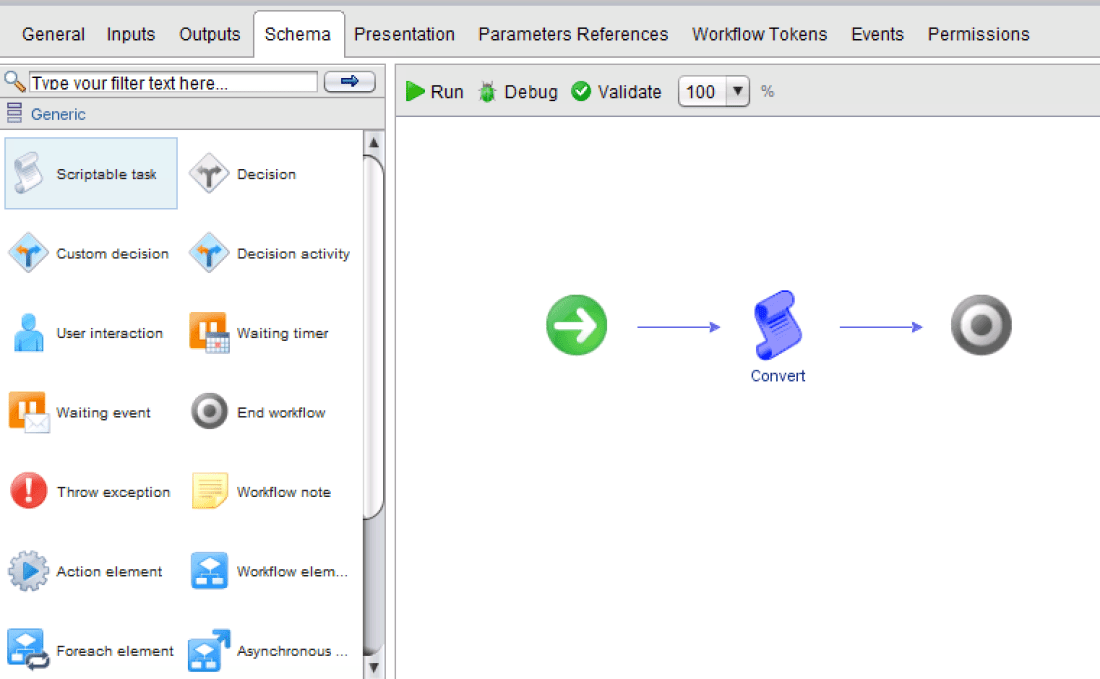
3. Go to Schema, put a scriptable task and call it “Convert”

1

4. Go to Script tab and put the following script in. Ensure attrCsvInput is recognised, it will be highlighted as pink.

var output = new Object();
var numberOfColumns = attrCsvInput.split('\n')[0].split(',').length;
var numberOfRows = attrCsvInput.split('\n').length - 1;
var tempArray = new Array();

for (i = 0; i > numberOfColumns; i++) {
    for (j = 1; j > numberOfRows; j++) {
        tempArray.push(attrCsvInput.split('\n')[j].split(',')[i]);
    }
    output[attrCsvInput.split('\n')[0].split(',')[i]] = tempArray;
    tempArray = new Array();
}
for (var k in output) {
    System.log('key is: ' + k + ', value is: ' + output[k]);
}

5. Finish off the visual binding as per below.

2

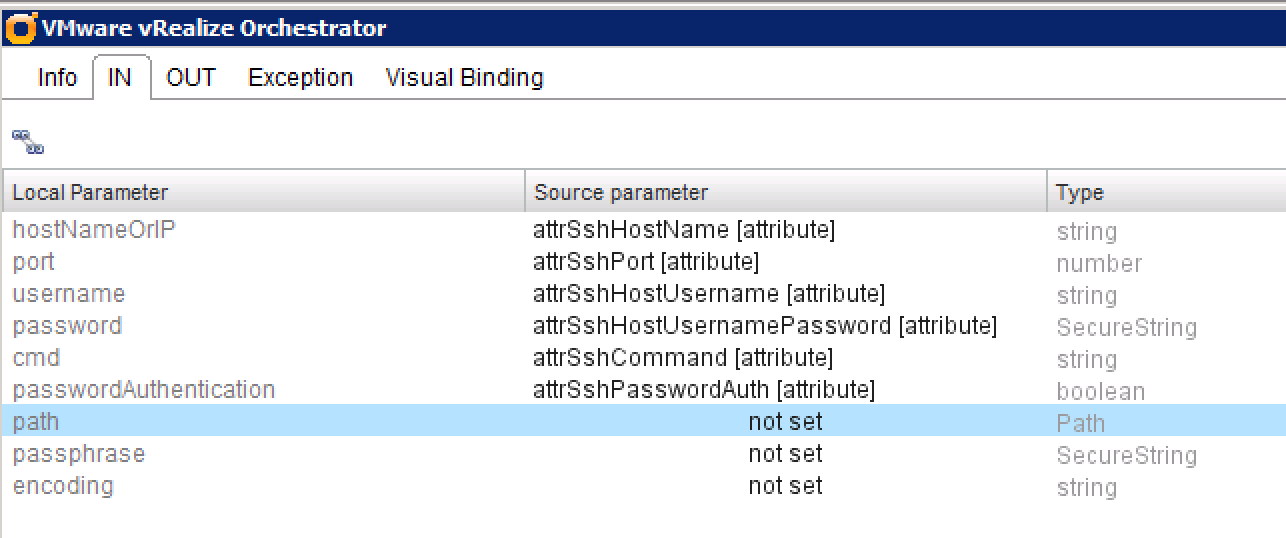
6. Let’s setup a SSH connection to a remote linux box. Search for the SSH workflow and put it between start and Convert scriptable task.

4

7. Finish off the binding as per below and make sure unused inputs are set to NULL, i.e. path, passphrase and encoding to NULL.

5

6

7

8

9

8. Run the workflow and you will see that the CSV file is converted to a multidimensional array, 3 keys Name, Age and Sex and values accordingly.

13

Use Cases

Replace the following bit in the end of the scriptable task to one below.

From:

for (var k in output) {
    System.log('key is: ' + k + ', value is: ' + output[k]);
}

To:

System.log("People younger than 30 are: ");
for (var o = 0; o < output["Age"].length; o++) {
    if (output["Age"][o] < 30) {
        System.log(output["Name"][o] + ": " + output["Age"][o]);
    }
}
Run the workflow. An example output attached below and as shown, people younger than 30 years old are listed.
14

Further, you could filter it by either man or woman…etc.

One of the recommendations is to create this parsing function as an action, input to be a CSV input and output to be a JavaScript array.

Hope this helped for who requires external parsing CSV input to a vRO workflow and as always, feel free to leave a commend for any clarifications or questions 😀

PowerCLI Report – Review SRM Source & Destination Network Settings

Introduction

Was asked to review SRM Recovery Plans especially on source and destination network settings that gets customised during failover. Due to large number of virtual machines to review, it was not ideal to go through recovery plans one by one. Thus, came up with a script to generate an output for review.

Environment

  • vCenter Server 5.0 U2
  • SRM 5.0 U2
  • PowerCLI 6.0 Release 1

Walk-through

First of all, I tried SRM API through PowerCLI, however the SRM API version was not at 2.0 so that I did not have access to all APIs. Hence, I had to find an alternative. Doing some research, found an executable called dr-ip-reporter.exe which allowed me to generate an XML file with all information that I needed. One thing popped up in my mind was to convert XML file into CSV. 

Running the executable to get XML output, copy it to where PowerCLI is installed was a little bit troublesome. Hence, came up with a plan to use psexec.exe to run the dr-ip-reporter.exe remotely and save the output as a variable. However, the executable did not have arguments for username and password. Therefore, this had to be ran manually.

Steps below:

  1. Login to Windows server where SRM server is installed.
  2. Open up a command prompt and run dr-ip-reporter.exe. Run the following command:
    • C:\Program Files\VMware\VMware vCenter Site Recovery Manager\bin\​dr-ip-reporter.exe –cfg C:\Program Files\VMware\VMware vCenter Site Recovery Manager\config\vmware-dr.xml –out C:\SRM\IP.xml –vc “vCenter IP or hostname” -i
    • 1
  3. Modify IP.xml file, the very top line “<?xml version=”2.0″ encoding=”UTF-8″?>” to “<?xml version=”1.0″ encoding=”UTF-8″?>” as per the following screenshot below:
    • Before
      • 2
    • After
      • 3

Once the pre-requisite is done:

  1. Copy the IP.xml and paste it to where  SRM-XML-Convert.ps1 script. 
  2. Run the SRM-XML-Convert.ps1
  3. Check the output, srm_final_output.csv

Sample Output

Looking at output below, you would be easily able to identify that:

  1. For TEST1 VM, recovery site DNS servers are missing
  2. For TEST2 VM, both protection and recovery site network setting is missing
  3. For TEST3 VM,  recovery site network setting is missing
"Protection Group","VM","Site","IP Address","SubnetMask","Gateway","DNS Servers" 
"PG1","TEST1","Site-1","10.10.1.1","255.255.255.0","10.10.1.254","10.10.1.253,10.10.1.252" 
"PG1","TEST1","Site-2","10.10.2.1","255.255.255.0","10.10.2.254","" 
"PG1","TEST2","Site-1","","","","" 
"PG1","TEST2","Site-2","","","","" 
"PG2","TEST3","Site-1","10.20.1.1","255.255.255.0","10.20.1.254","10.10.1.253,10.10.1.252" 
"PG2","TEST3","Site-2","","","",""

Script


<# 
Import IP.xml generated from DR IP Reporter 
Foreach line of IP.xml file, select components needed. 
In this case: 
    Protection Group 
    Name of the VM 
    Site 
    IP Address 
    Subnet Mask 
    Gateway 
    DNS Servers 
#>

[xml]$input_file = Get-Content IP.xml​
$output = $input_file.DrMappings.ProtectionGroups.ProtectionGroup | Sort Name | ForEach-Object {
    $protection_group = $_.Name
    $_.ProtectedVm | Sort Name | ForEach-Object {
        $vm = $_.Name
		
        $_.CustomizationSpec | Sort Site | ForEach-Object {
            $site = $_.Site
            $ip_settings = $_.ConfigRoot.e.ipSettings
			
            if ($ip_settings) {
                $ip_address = $ip_settings.ip.ipAddress
                $subnetmask = $ip_settings.subnetMask
                $gateway = $ip_settings.gateway.e."#text"
				
                if ($ip_settings.dnsServerList.e) {
                    $dns_server = [string]::Join(",", ($ip_settings.dnsServerList.e."#text"))
				}
            }

            "" | Select @{N="Protection Group";E={$protection_group}},
                        @{N="VM";E={$vm}},
                        @{N="Site";E={$site}},
                        @{N="IP Address";E={$ip_address}},
                        @{N="SubnetMask";E={$subnetmask}},
                        @{N="Gateway";E={$gateway}},
                        @{N="DNS Servers";E={$dns_server}}
						
            $ip_address = "";
            $subnetmask = "";
            $gateway = "";
            $dns_server = "";
        }
    }
}

$output | Export-Csv -UseCulture -NoTypeInformation srm_final_output.csv​
Disconnect-VIServer * -Confirm:$false​

Hope this and feel free to contact me for any clarifications 😀

vCenter Server 6.0 – Licensable Entity Does Not Exist

Introduction

Recently, I worked on an issue where vCenter Server Appliance 6.0 U1 was rebuilt and was not able to assign vCenter Server license key with the following error message:

1

After a review, it was found out that the license key was not removed before decommissioning the old VC. As a result, old VC asset was registered with the license key and removing the asset thrown up an error:

License entity does not exist

Environment

The vSphere environment was set as the following:

  1. 1 x vCenter Server Appliance 6.0 U1
  2. 1 x Windows vCenter Server 6.0 U1
  3. 1 x Appliance External PSC 6.0 U1
  4. 1 x Windows External PSC 6.0 U1
    • 1 x SSO domain
    • 1 x SSO site

What Happened?

  1. Decommissioned VCSA 6.0 U1 without removing VC license key from the license page
  2. Rebuilt VCSA 6.0 U1 with external PSC with the same configuration as before
  3. Existing PSC thinks that the old asset still exists

Solution

Worked with VMware Support and they advised that the issue is due to the old entity still reamining in the VMware Directory Service database whereas the old asset was removed. The solution was simple enough, remove the old entity.

To do the work, JXplorer was required. Download it here.

  1. Install JXplorer and run it. On the left top corner, click Connect to a DSA
    • 2
  2. Use the following to connect to VMware Directory Service database:
    • Host: FQDN of the Host
    • Protocol: LDAP v3
    • Base DN: dc=vsphere,dc=local
      • This is the default SSO domain, vSphere.local
      • If it’s not default, change it accordingly
    • Level: User + Password
    • User DN: cn=administrator,cn=users,dc=vsphere,dc=local
      • Again, this is the default SSO domain. If it’s not default, change it accordingly
    • Password: password for administrator@vsphere.local
    • 3
  3.  Once connected, expand out like the following:
    • 4
  4. Search for the LicenseEntity where:
    • vmwLicSvcLicenseName: vCenter Server 6 – vCenter Server Name
    • vmwLicSvcLicenseSerialKeys: Equal to the license key that you cannot remove
    • 5
  5. Before deleting the problematic LicenseEntity,  take snapshot on:
    • 2 x vCenter Servers
    • 2 x external PSCs
  6. Delete the LicenseEntity
  7. Once deleted, SSH to PSC and restart the following services in order:
    1. VMware Security Token Service
    2. vmware-stsd
    3. VMware Identity Management Service
    4. vmware-sts-idmd
    5. VMware License Service
    6. vmware-cis-license
  8. The actual commands below:
    1. service-control –stop vmware-stsd
    2. service-control –start vmware-stsd
    3. service-control –stop vmware-sts-idmd
    4. service-control –start vmware-sts-idmd
    5. service-control –start vmware-cis-license
    6. service-control –start vmware-cis-license
    7. 6
  9. When services are restarted, ensure the Asset is gone from the licensing page
  10. Now, you will be able to remove the license key
  11. Then, add the license key back asssigning it to the new VC
  12. Delete the snapshots

Hope this was helpful and feel free to leave a comment for any clarifiations 😀