vMSC & 3PAR – Interesting Behaviour

Introduction

VMware Metro Storage Cluster is defined as:

vMSC is a certified configuration for stretched storage cluster architectures. A vMSC configuration is designed to maintain data availability beyond a single physical or logical site. A storage device configured in the vMSC configuration is supported after successful vMSC certification.

The benefit vMSC provides is simple. When a disaster happens at one datacentre, HA kicks in and fails over virtual machine to another datacentre automatically. It’s a normal vCenter server cluster with HA/DRS enabled but half ESXi servers are in one datacentre and the rest are in another datacentre.

We deployed vMSC with HP 3PAR peer-persistence functionality (more details could be found here). Before putting it into production, performed functional testing to ensure it works as expected and during a certain testing, found an interesting behaviour with 3PAR.

I won’t be going through all configurations needs to be done on vMSC. I would suggest you to read the following articles and book:

Infrastructure

The following is how VMware and SAN infrastructure is setup (I will be excluding networking components as it’s not a major component in this test):
  • 2 x physical datacetres
    • Datacentre_A and Datacentre_B
  • 2 x vCenter servers
    • vCenter_A and vCenter_B
    • A for Datacentre_A and B for Datacentre_B
  • 1 x Metro Storage Cluster
    • Located in vCenter_A
  • Multiples of ESXi servers
    • ESXi_A, ESXi_B… and so on
    • Only 2 are shown in the figure below
  • 2 x 7400 3PAR
    • Storage_A and Storage_B

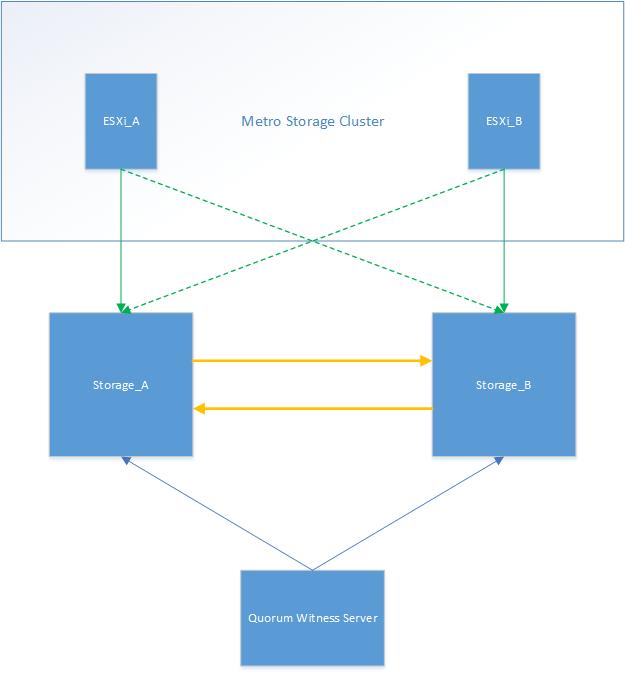
Overall architecture is attached below (it’s a very high level diagram, detailed one could be found in introduction references):

  1. Green line represents the FC connection between ESXi server and 3PAR storage
  2. Green dotted line represents the active/standby FC connection between ESXi server and 3PAR storage
  3. Yellow line represents the replication link between 3PAR storages
  4. Blue line represents the network connection between 3PAR storages and Quorum witness server
vMSC_1

Assumption

Assumptions made are listed below:
  1. Virtual machines are uniformly accessing datastores. For instance, virtual machine running in ESXi_A uses Storage_A.
  2. Disk.AutoremoveOnPDL is set to 0 and VMkernel.Boot.terminateVMOnPDL to true.
    • A script attached below could be used to validate these two advanced settings.
foreach ($esxi in (Get-Cluster -Name “Name of the cluster(s)" | Get-VMHost | sort Name)) { 
    $advanced_setting = [string]::Join(", ", ($esxi | Get-AdvancedSetting | where {$_.Name -match "Disk.AutoremoveOnPDL|VMkernel.Boot.terminateVMOnPDL" } | %{$_.Name + ":" + $_.Value})) 
    $esxi | select Name, @{N="Advanced Settings";E={$advanced_setting}} 
}

Test Plan

The test plan is outlined below:
  1. Disconnect the ISLs between two datacentres, only FC connection
  2. Disconnect the network link between Quorum witness server and Storage_A

A figure is attached below:

vMSC_2

Expected Result

The following is what’s expected with the test above:
  1. Storage_A loses connection to Storage_B as well as the Quorum witness server
  2. To prevent data corruption, Storage_A stops all I/O
  3. Storage_B fails over from read-only to read/write
  4. ESXi_A receives PDL sense codes, i.e. H:0x0 D:0x2 P:0x0 Valid sense data: 0x5 0x25 0x0 from Storage_A
  5. HA kills the virtual machines in PDL state and unregister from the inventory
  6. HA registers killed virtual machines to ESXi_B accessing Storage_B and power-on

Actual Result

Performing the test, interesting behaviour was noticed. All ESXi servers in Datacentre_A were not responding. Re-connecting ESXi server didn’t work, they were hanging.

To investigate into the issue, made a SSH connection to one of the ESXi servers and opened the vmkernel.log. While looking into it, found a few interesting lines (brief summary):

  1. Could not select path
  2. Awaiting fast path state update
  3. No more commands to retry

The log was telling that ESXi servers were keep trying to search for the available path and eventually, it failed to find one. Running esxcfg-mpath -b outputted 4 dead paths and 4 standby paths.

How does ESXi know that it should stop looking for active path? It should receive either PDL or APD sense codes. The next element I looked into was PDL sense codes in the vmkernel.log. I used vCenter Log-Insight to filter by H:0x0 D:0x2 P:0x0 Valid sense data: 0x5 0x25 0x0 but couldn’t find any.

To summarise what happened, when Storage_A stopped all I/O from ESXi_A, it did not send PDL sense codes to ESXi_A. As a result, ESXi_A was keep looking for active paths on and on and finally, it failed. This put ESXi servers in not responding state.

The only way to fix this issue was to reboot the affected ESXi servers.

After having a chat with 3PAR engineers, this is a known behaviour and it’s by design meaning that 3PAR won’t send PDL sense codes to ESXi servers when it stops all I/O.

Wrap-Up

This test scenario is a very special case. Losing network connection from the Quorum witness server to only one 3PAR and losing only FC ISLs between 3PARs is highly unlikely to happen. However, important element found in this test is that 3PAR doesn’t send PDL sense codes when it stops I/O to prevent data corruption. So in future, if this happens, rebooting all ESXi servers should be executed ASAP instead of waiting for HA to failover virtual machines automatically.

vSphere Migration Scenario #1

Introduction

I’ve been doing a lot of virtual machine migration work, both physical to virtual (P2V) and virtual to virtual (V2V) and with the recent migration work, I faced a challenging scenario and decided to share my experience.

Requirements

There was only one requirement:
  1. There should be no outage during migration
    • 1 or 2 packet loss is fine

Infrastructure

The VMware infrastructure is setup as following:
  1. Two clusters in a same vCenter server:
    • Source_Cluster
    • Destination_Cluster
  2. Each cluster has 4 ESXi servers
  3. Storage is FC based but not shared across clusters and storage systems are different:
    • Source_Cluster uses Storage_VendorA
    • Destination_Cluster uses Storage_VendorB
  4. Each cluster has it’s own dvSwitch:
    • Source_dvSwitch
    • Destination_dvSwitch
  5. There are two 10GBe uplinks for all ESXi servers in Source_Cluster & Destination_Cluster
  6. Different network configuration on physical interfaces:
    • LAG & LACP are enabled on the Destination_Cluster
    • Active/Active on the Source_Cluster, i.e. no LAG
  7. Management & vMotion VMkernel are in different VLAN
    • VLAN 1000 for Source_Cluster
    • VLAN 2000 for Destination_Cluster
  8. vMotion VMKernels are in different subnet
  9. There is only one shared VLAN, VLAN 3000

Pre-requisites

The plan was to migrate virtual machines from source cluster to destination cluster with the new migration type “Change both host and datastore” (note that it’s available on web-client only).

To use this new feature, there were some pre-requisites to be met:

  1. Source and destination ESXi servers must be in a same dvSwitch, with at least one uplink for both dvSwitches from both ESXi servers
  2. The vMotion VMkernels for source and destination ESXi servers must be in a same subnet
  3. Virtual machines must be using a portgroup that’s available on both source and destination ESXi servers
  4. Storage doesn’t have to be shared
    • Storage vMotion without shared storage rely on network, i.e. vMotion network

How could we achieve this? Let’s take a look at it in depth, a figure is attached below.

Migration1

The above figure represents how the clusters are setup (before migration). To allow vMotion and storage vMotion to work, firstly, a single dvSwitch must be shared across. Since the destination ESXi server is configured with LAG & LACP, it’s decided pull one uplink out from the source dvSwitch and add it to the destination dvSwitch. It will look like the following:

Migration2

Next task is to put vMotion VMkernels in a same subnet and it needs to be performed for all 8 ESXi servers. Make sure you record the previous VMkernel information as they will have to be used while reverting back.

The last bit is, all virtual machines must be using a portgroup that is shared between clusters. This could be accomplished simply by using a portgroup in destination dvSwitch, please make a reference to the figure above.

There are 3 ways of doing this:

  1. Modifying portgroup on virtual machine edit settings
  2. dvSwitch Manage Portgroup
  3. Script

Whichever is used, the outcome will be the same.

To summarise what needs to be done:
  1. Add destination dvSwitch to Source ESXi
  2. Pull one uplink out from source dvSwitch and add it to destination dvSwitch
  3. Re-configure vMotion VMkernels for all ESXi servers to be in VLAN3000
  4. Change the portgroup of virtual machines to the one in destination dvSwitch

For the above change, only 1 source ESXi server was configured. The reason behind is that if one 10GBe uplink is pulled out from source dvSwitch, the existing virtual machines will be running with 1 x 10GBe uplink. This might potentially cause a performance issue for some virtual machines that require extensive network bandwidth. To minimise the impact, it’s been decided to use 1 source ESXi server purely for the migration. I will call this one as ESXi_For_Migration.

Migration Plan

The following is the finalised migration plan:
  1. Migrate virtual machines to ESXi_For_Migration
  2. Change the portgroup on virtual machines running on ESXi_For_Migration to one in destination dvSwitch
  3. vMotion & storage vMotion virtual machines to the destination cluster
  4. Once done, vMotion virtual machines from one of the 3 ESXi servers to ESXi_For_Migration (Alternatively, it is possible to place the ESXi server on maintenance mode if DRS fully automated is used)
  5. Repeat 2~4 for until the migration is finished
  6. Once all done, bring one uplink back to source dvSwitch and remove destination dvSwitch from ESXi_For_Migration
  7. Put vMotion VMkernels back to original VLANs, i.e. 1000 for source and 2000 for destination for all ESXi servers

Wrap-Up

Hopefully the migration scenario explained above will help you if you are in a migration project and looking for a real life example.

In near future, I will upload another migration scenario that might be useful.


webCommander – Static Page

Introduction

We have been using a web portal for VMware related static reports, e.g. Cluster information, ESXi information. The reports were used by lots of managers to review our virtualised infrastructure. The original way of doing this was:
  • Run PowerCLI script using Windows Task Scheduler everyday 6am and generate a .csv file
  • Load .csv generated by PowerCLI script from the web portal

webCommander was released several months ago and decided to replace the whole reports from the web portal into this. However, I found that it is only able to run the actual script to generate an output. One of the problems was that if the user wanted to review the whole virtual machines, it took a several hours to generate the output.

To overcome this, I was looking for a way of outputting a report without running a script and finally got it.

In this post, I will be going through what & how to configure in order to generate a static report on webCommander. I recommend you to read this article in advance as I will be using Google Table for the report.

webCmd.php

One Assumption I made was that the name of the script must start with “Report-.*”. This could be changed to your script naming convention.

In webCmd.php, if the script name starts with Report-, it will load webcommander_static xsl template which will bypass parameter checking. This will be discussed later in this post. The modification I made is underlined and attached below:

if ( $command == “") {
…...
## Static Page Start ##

} elseif ( preg_match ("/^Report\-/", $command) ) {
  $xml = simplexml_import_dom($dom);
  $query = '/webcommander/command[@name="' . $command . '"]';
  $target = $xml->xpath($query);
  if (count($target) == 0){
    $xmloutput .= "<script>alert('Could not find command \"" . $command . "\"!')</script>";
    $xmloutput .= "<script>document.location.href='webcmd.php'</script>";
  } else {
    $target = $target[0];
    header("Content-type:text/xml");
    $xmloutput .= '<?xml version="1.0" encoding="utf-8" ?>';
    $xmloutput .= '<?xml-stylesheet type="text/xsl" href="webCmd.xsl"?>';
    $xmloutput .= '<webcommander_static cmd="' . $command . '" developer="' . $target["developer"] .'">';
    $scriptName = (string)$target->script;
    $psPath = realpath('../powershell/');
    chdir($psPath);
    $cmd = "powershell .\\" . $scriptName . ".ps1";        
    callPs1($cmd);
    $xmloutput .= '</webcommander_static>';
  }
echo $xmloutput;

## Static Page Ends ##

} else {
……
}
echo $xmloutput;

webCmd.xml

It’s very similar to normal entries you create in webCmd.xml, the only difference is that there will be no parameters defined. An example is attached below:
<command name="Report-Cluster" description="[vSphere] Report - Clusters" developer="s.kang">
    <script>Report-Cluster</script>
</command>

As stated above, the name of script starts with Report-.*”. In this case, it’s called “Report-Cluster”.

webCmd.xsl

This is where webCmd.php loads a static template. I defined two templates:
  • webcommander_static
  • static

webcommander_static is to replace the original webcommander template. The difference between these two is, as expected, it doesn’t define parameters.Instead of using “result” template to output result, I defined a new one called “static”. The reason is that customisation becomes easier in future, i.e. divide the page into two columns, one for table and the another for chart.

For now, I only put Google Table in:

<!-- Static Page Starts!-->
<xsl:template match="webcommander_static">
<html>
    <head>
    <title>webCommander</title>
        <meta http-equiv="Content-Type" content="text/html; charset=UTF-8" />
        <link href="webCmd.css" rel="stylesheet" type="text/css" />
        <link rel="stylesheet" href="https://code.jquery.com/ui/1.9.2/themes/base/jquery-ui.css" />
        <script src="https://code.jquery.com/jquery-1.8.3.js"></script>
        <script src="https://code.jquery.com/ui/1.9.2/jquery-ui.js"></script>
        <script src="webCmd.js"></script>
    </head>
    <body>               
        <xsl:call-template name="header"/>
        <xsl:call-template name="returnCode"/>
        <xsl:if test="/webcommander/annotation">
        <xsl:call-template name="annotation"/>
    </xsl:if>
    <div id="content">
        <xsl:call-template name="static"/>
    </div>
    </body>
</html>
</xsl:template>
<!-- Static Page Ends !-->

<!-- Static Result Starts !-->
<xsl:template name="static">
    <h2>Result</h2>
    <div id="result">
        <xsl:if test="result/table">
            <head>
            <script type='text/javascript' src='https://www.google.com/jsapi'></script>
            <script type='text/javascript'>
                google.load('visualization', '1', {packages:['table']});
                google.setOnLoadCallback(drawTable);
                function drawTable() {
                var data = new google.visualization.DataTable();
                <xsl:value-of select="result/table/listcolumns" />
                <xsl:value-of select="result/table/listrows" />
                var table = new google.visualization.Table(document.getElementById('table_div'));
                table.draw(data, {showRowNumber: true});
                }
            </script>
            </head>
            <div id='table_div'></div>
        </xsl:if>
    </div>
</xsl:template>
<!-- Static Result Ends !-->

PowerCLI Script

For PowerCLI scripts, I wrote two parts:
  • Generate-xxx.ps1
  • Report-xxx.ps1

Generate-xxx.ps1 will be ran under Windows Task Scheduler to generate a .csv file daily basis and the result will be exported with today’s date. An example is attached below:

Generate-Cluster.ps1

Connect-VIServer -Server “Your vCenter server” -User “Username” -Password “Password"

$attributes = "vCenterServer,Cluster,NumberOfESXi,ActiveVM,AvailableCPUMHz,TotalCPUMHz,AvailableMemoryGB,TotalMemoryGB,Version4.x,Version5.x"
$result = '' | select vCenterServer,Cluster,NumberOfESXi,ActiveVM,AvailableCPUMHz,TotalCPUMHz,AvailableMemoryGB,TotalMemoryGB,"Version4.x","Version5.x"

$result = foreach ($cluster in Get-Cluster | Sort Name) {
    $esxi = Get-VMHost -Location $cluster | Sort Name
    $total_cpu = ($esxi  | %{$_.CpuTotalMHz} | Measure-Object -Sum).Sum
    $available_cpu = $total_cpu - (($esxi  | %{$_.CPUUsageMHz} | Measure-Object -Sum).Sum)
    $total_memory = ($esxi  | %{$_.MemoryTotalGB} | Measure-Object -Sum).Sum
    $avaialble_memory = $total_memory - (($esxi  | %{$_.MemoryUsageGB} | Measure-Object -Sum).Sum)

    $count = 0
    $esxi | Foreach-Object { if ($_.Version -match "^4.*") { $count++ } }
    $count = 0
    $esxi | Foreach-Object { if ($_.Version -match "^5.*") { $count++ } }

    $result.vCenterServer = $cluster.ExtensionData.Client.ServiceUrl -replace "https://" -replace "/sdk"
    $result.Cluster = $cluster.Name
    $result.NumberOfESXi = ($cluster.ExtensionData.Host.Value | Measure-Object).Count
    $result.ActiveVM = ($esxi | Get-VM | where {$_.PowerState -eq "PoweredOn"} | Measure-Object).Count
    $result.TotalCPUMHz = $total_cpu
    $result.AvailableCPUMHz = $available_cpu
    $result.TotalMemoryGB = "{0:N2}" -f $total_memory
    $result.AvailableMemoryGB = "{0:N2}" -f $avaialble_memory
    $result."Version4.x" = $count
    $result."Version5.x" = $count
    $result | select *
}
$today = Get-Date | %{[string]$_.Day + "." + $_.Month + "." + $_.Year}
$filename = "generate-cluster-“ + $today + ".csv"
$result | sort vCenterServer,Cluster | Export-Csv E:\Cluster\$filename

Disconnect-VIServer * -Confirm:$false

Report-Cluster.ps1

Report-xxx.ps1 is where it loads the .csv file and present it on webCommander. An example is attached below:

. .\objects.ps1

$attributes = "vCenterServer,Cluster,Description,NumberOfESXi,ActiveVM,AvailableCPUMHz,TotalCPUMHz,AvailableMemoryGB,TotalMemoryGB,Version4.x,Version5.x"

$today = Get-Date | %{[string]$_.Day + "." + $_.Month + "." + $_.Year}
$filename = "generate-cluster" + $today + ".csv"

$result = Import-CSV E:\Cluster\$filename

Google-Table $attributes $result

Result

On the webCommander home page, when you click Report-Cluster icon, it will bypass parameter checking bit and show you the report instantly. Attaching a sample result:
Screen Shot 2014-06-16 at 3.34.51 pm

Wrap Up

I think this is not the best way of creating a static page. I believe Jerry (@9whirls) could develop it in a better way, maybe in the next release. In future, it will be possible to create few more functions such as download the output as .csv, send it via email…etc

Another work could be done is that instead of exporting/importing .csv file, using a proper database could be a possible option. I used IBM DB2 to store historical data using PowerCLI in the past and I am sure it could be used in this case as well.

Hope you enjoy and ping me for any questions.