vRO Deepdive Series Part 4 – Log Handling, Exception Handling and Failing Back

Introduction

Continuing the vRO deep dive series and this is the 4th part. This will be discussing log handling, exception handling and failing back.

Feel free to revisit the previous deep dive series:

Log Handling

vRO provides 3 types of log handling:

  • Log
  • Warning
  • Error

Let’s do some exercise and see the difference between them.

First of all, create a workflow calling it what you would like to (I called it “hi”) and navigate to the Log tab under Schema. You will find 7 default loggings:

Screenshot 2015-06-16 09.44.53

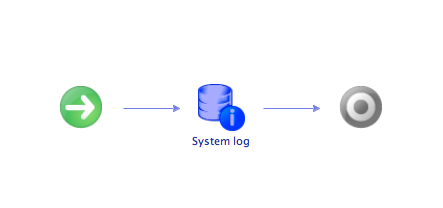
For the starters, let’s try System log out. Drag and drop the element in like the following:

Screenshot 2015-06-16 09.45.39

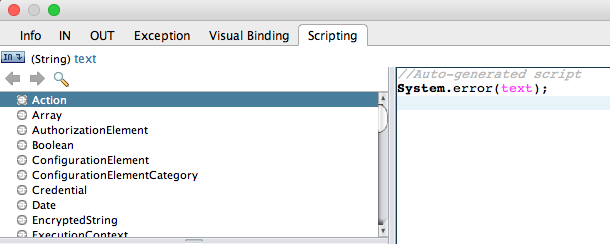
Edit the System log and navigate to Scripting. You will find an auto-generated script “System.log(text);”.

Screenshot 2015-06-16 09.45.53

Let’s take a look at System warning and error as well, drag and drop others like the following screenshot:

Screenshot 2015-06-16 09.48.46

Edit the System warning and it will show you a similar script as System log, “System.warn(text);”

Screenshot 2015-06-16 09.46.43

Pretty much identical for System error, “System.error(text);”

Screenshot 2015-06-16 09.46.56

Let’s run the workflow and see how they look differ on the vRO logging tab. Create an attribute called attrText and the value to be “Different types of logging”.

Screenshot 2015-06-16 09.47.31

For each element, finish up the visual binding like the following:

Screenshot 2015-06-16 09.47.54

Time to run the workflow. Execute and it will present 3 different types of logging:

  • Log in a normal font
  • Warning in bold
  • Error in red and bold

Screenshot 2015-06-16 09.49.09

One thing I would like to highlight before moving on is that you do not need to use the above element in order to do logging. Within a scriptable task, you could always use System.log(text), System.warn(text) or System.error(text). Will go a bit deeper into this shortly.

Time for a proper exercise! For the next, I will be going through creating a network adapter on a virtual machine with different types of network adapters.

First of all, remove all 3 logging elements made previously and drag and drop a scriptable task. Navigate to the Scripting tab and paste the following script in:

System.log("Adding a virtual NIC to this VM with portgroup: " + Portgroup.name);
// Create connectable info for network
var connectInfo = new VcVirtualDeviceConnectInfo();
connectInfo.connected = true;
connectInfo.startConnected = true;
connectInfo.allowGuestControl = false;
// Create Network BackingInfo
var netBackingInfo = new VcVirtualEthernetCardDistributedVirtualPortBackingInfo();
netBackingInfo.port = new VcDistributedVirtualSwitchPortConnection();
netBackingInfo.port.switchUuid = Portgroup.config.distributedVirtualSwitch.uuid;
netBackingInfo.port.portgroupKey = Portgroup.key;
// Create VirtualNetwork
if (Type.toUpperCase() === "VMXNET3") {
vNetwork = new VcVirtualVmxnet3();
} else if(Type.toUpperCase() === "E1000E") {
vNetwork = new VcVirtualE1000e();
}
vNetwork.backing = netBackingInfo;
vNetwork.addressType = "Generated";
vNetwork.connectable = connectInfo;
// Create Network ConfigSpec
var deviceConfigSpec = new VcVirtualDeviceConfigSpec();
deviceConfigSpec.device = vNetwork;
deviceConfigSpec.operation = VcVirtualDeviceConfigSpecOperation.add;
var configSpec = new VcVirtualMachineConfigSpec();
var configSpecArray = new Array(); 
configSpecArray.push(deviceConfigSpec);
configSpec.deviceChange = configSpecArray;
// Run the task
Task = VM.reconfigVM_Task(configSpec);

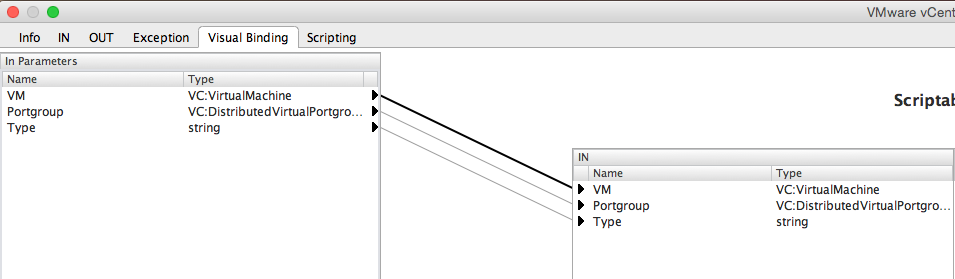
Once the script is in place, create three inputs as per the following screenshot:

Screenshot 2015-06-16 11.04.08

As depicted above, the workflow will require 3 inputs from the end users; virtual machine, portgroup and type. For the type, instead of asking the end user to manually type the input in, it would be better to pre-define a list and let them select one. This would make it easier for both workflow developers and users.

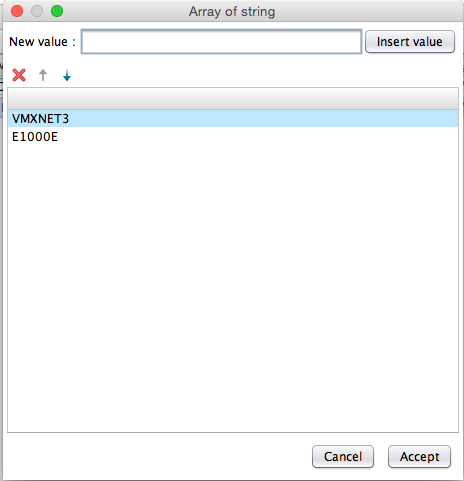
Go back to the General tab, change the type of the attribute attrTypeList to Array of string and add VMXNET3 and E1000E:

Screenshot 2015-06-16 11.04.31

Screenshot 2015-06-16 11.04.26

Once done, go to Presentation tab, select Type, choose “Predefined list of elements” and link it to pre created attribute attrTypeList.


Screenshot 2015-06-16 11.05.04

Screenshot 2015-06-16 11.05.14


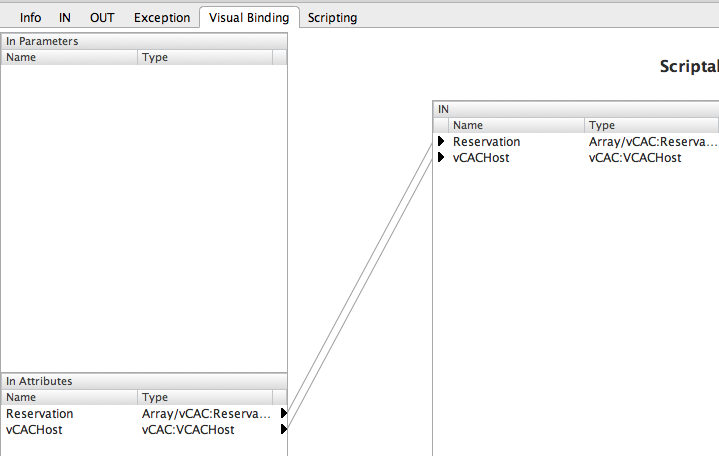
Lastly, finish off the Visual Binding:

Screenshot 2015-06-16 11.05.47

All done! Let’s run the workflow to ensure it does the job. For the next example, I will be choosing a portgroup with VLAN1153 and VMXNET3 network adapter.

Screenshot 2015-06-16 11.18.10

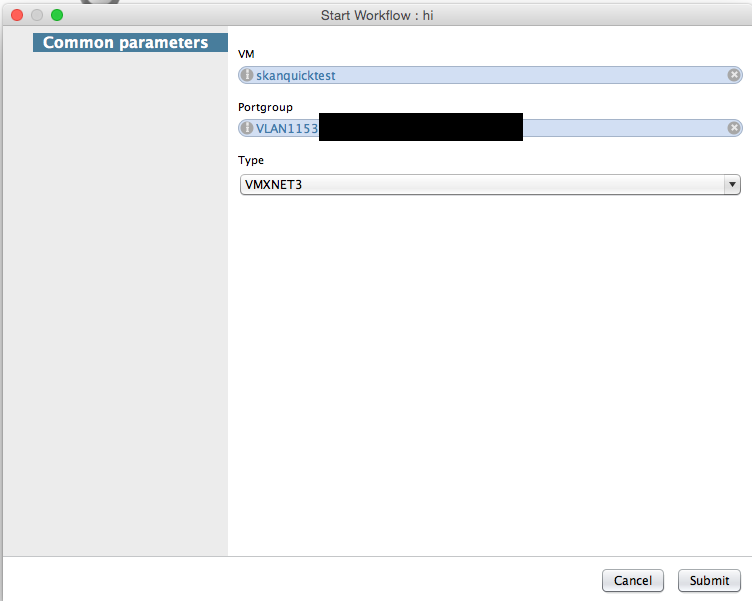
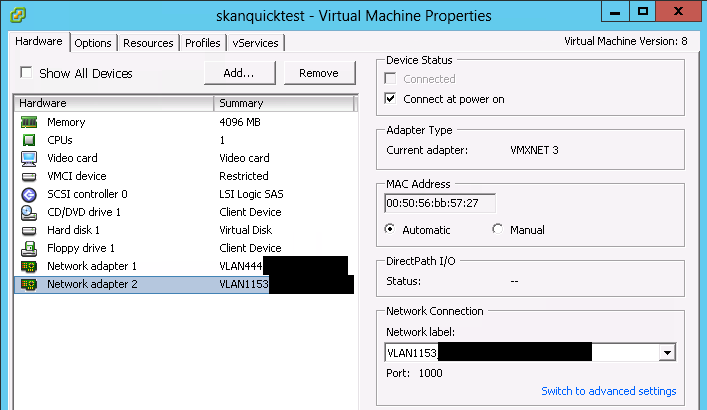
Submit the request. Once the workflow completes, see if VMXNET 3 network adapter with portgroup VLAN1153 has added:

Screenshot 2015-06-16 11.19.01

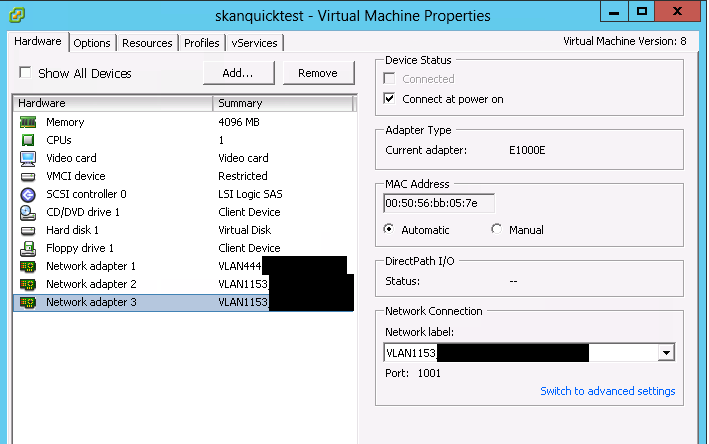
Let’s create another one with VLAN1153 in E1000E type. Submit another request:

Screenshot 2015-06-16 11.19.50

Now we are confident that the workflow creates a portgroup as intended, it’s time to go through the logging. What I will be showing shortly is:

  • Selecting VMXNET3 = informational message will be logged
  • Selecting E1000E = warning message will be logged

Go back to the scriptable task and modify like the following:

Old

// Create VirtualNetwork
    if (Type.toUpperCase() === "VMXNET3") {
    vNetwork = new VcVirtualVmxnet3();
} else if(Type.toUpperCase() === "E1000E") {
    vNetwork = new VcVirtualE1000e();
}

New

// Create VirtualNetwork
if (Type.toUpperCase() === "VMXNET3") {
    vNetwork = new VcVirtualVmxnet3();
    System.log("VMXNET3 Virtual Adapter will be created");
} else if(Type.toUpperCase() === "E1000E") {
    vNetwork = new VcVirtualE1000e();
    System.warn("VMXNET3 is recommended, but E1000E will be created");
}

Have a look at the example runs below:

  • 1 x VLAN997 VMXNET3 portgroup

Screenshot 2015-06-16 11.26.38

  • 1 x VLAN997 E100E portgroup

Screenshot 2015-06-16 11.28.08

This is how informational or warning message could be used. For the error message, it will be discussed in the next topic “Exception Handling”.

Exception Handling

An exception handling in the programming world is defined as

Exception handling is the process of responding to the occurrence, during computation, of exceptions – anomalous or exceptional conditions requiring special processing – often changing the normal flow of program execution

Why would you need to do exception handling? The reason is simple, when something never expected happens, information of the exception has to be handled, e.g. error message logged, locate where it happened…etc, which will allow easier troubleshooting for the developers.

The best way to catch an exception is to use try & catch:

try {
    ...... script
} catch (e) {
    System.error(e);
}

Whatever fails in try statement, the error message will be saved to the variable e and then logged as an error message.

Will be continuing with the example used in the previous section. Edit the scriptable task and replace the whole lines with the following script:

Script

try {
    System.log("Adding a virtual NIC to this VM with portgroup: " + Portgroup.name);
    // Create connectable info for network
    var connectInfo = new VcVirtualDeviceConnectInfo();
    connectInfo.connected = true;
    connectInfo.startConnected = true;
    connectInfo.allowGuestControl = false;

    // Create Network BackingInfo
    var netBackingInfo = new VcVirtualEthernetCardDistributedVirtualPortBackingInfo();
    netBackingInfo.port = new VcDistributedVirtualSwitchPortConnection();
    netBackingInfo.port.switchUuid = Portgroup.config.distributedVirtualSwitch.uuid;
    netBackingInfo.port.portgroupKey = Portgroup.key;

    // Create VirtualNetwork
    if (Type.toUpperCase() === "VMXNET3") {
        vNetwork = new VcVirtualVmxnet3();
        System.log("VMXNET3 Virtual Adapter will be created");
    } else if(Type.toUpperCase() === "E1000E") {
        vNetwork = new VcVirtualE1000e();
        System.warn("VMXNET3 is recommended, but E1000E will be created");
    }

    vNetwork.backing = netBackingInfo;
    vNetwork.addressType = "Generated";
    vNetwork.connectable = connectInfo;
    
    // Create Network ConfigSpec
    var deviceConfigSpec = new VcVirtualDeviceConfigSpec();
    deviceConfigSpec.device = vNetwork;
    deviceConfigSpec.operation = VcVirtualDeviceConfigSpecOperation.add;
    
    var configSpec = new VcVirtualMachineConfigSpec();
    var configSpecArray = new Array();
    configSpecArray.push(deviceConfigSpec);
    configSpec.deviceChange = configSpecArray;
    
    // Run the task
    Task = VM.reconfigVM_Task(configSpec);
} catch (e) {
    System.error(e);
}

Causing an exception with this workflow is quite simple, just pick a portgroup that the virtual machine doesn’t have access to. In this example, VLAN23 was chosen:

Screenshot 2015-06-16 11.50.40

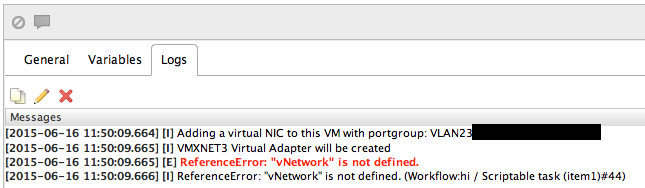
Since VLAN23 portgroup doesn’t exist, it now presents an error message saying “vNetwork is not defined”. One odd thing here is that looking at history of the workflow, it says the workflow was successful. Why is this? It’s because the exception was caught but wasn’t thrown properly, i.e. the workflow was not terminated. The way of throwing an exception is using “throw” statement. Add the throw statement like the following:

Old

} catch (e) {
    System.error(e);
}
New
} catch (errorCode) {
    System.error(errorCode);
    throw errorCode;
}

Once the change is made, the error will be thrown when an exception happens. One thing to consider is, where will it be thrown to? The exception must be handled once it is thrown.

Go back to the Schema and under the Generic tab, you will be able to find “Throw Exception” element.

Screenshot 2015-06-16 11.51.06

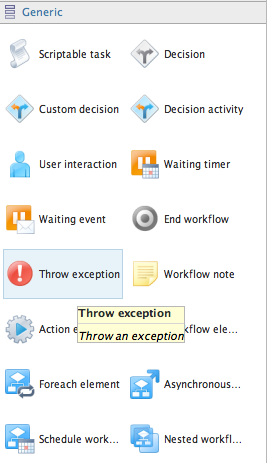
Throw exception element could be treated as End workflow but the difference is, the workflow was successful or failed.

Drag and drop the Throw exception element on the Scriptable task and a dotted red arrow will be created.

Screenshot 2015-06-16 11.51.21

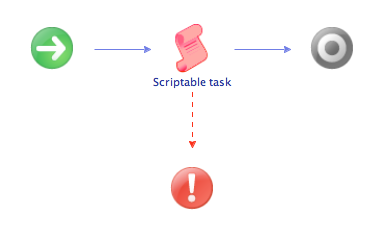
Doing this will automatically create an attribute called errorCode. The purpose of this attribute is to catch any exception was thrown and forward it to the Throw exception element. This is why the variable e has been modified to errorCode earlier.

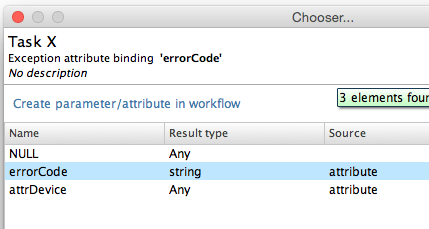
Saving the workflow will cause an error saying “Exception binding was not set”. This is because the workflow expects the scriptable task to bind the error message as an attribute. Edit the scriptable task, navigate to Exception and bind it to errorCode:

Screenshot 2015-06-16 11.51.30

Also, do the visual binding like below:

Screenshot 2015-06-16 11.52.05

Let’s run the workflow again choosing VLAN23. Unlike the previous example, now it will end in the throw exception state (the Throw exception element is highlighted).

Screenshot 2015-06-16 11.53.30

This is how you handle exceptions and will be moving onto fail-back process.

Fail-back

In my opinion, fail-back is one of the important aspects when developing a workflow. Continuing with the example above, let’s say there are 3 more tasks after creating a network adapter which I will be calling X, Y and Z and if task Y fails, what would you do to the network adapter created in the previous stage? The answer is obvious, it has to be removed, you don’t want the users to run the workflow multiple times ending up with 10 identical network adapters on a single virtual machine.

Let’s implement a simple fail-back process in this workflow. First of all, create an attribute called attrDevice with type to be Any (well there is no type with VC:VirtualDevice). This will be used to keep the device information.

Screenshot 2015-06-16 13.39.04

Once done, drag and drop 3 scriptable tasks between Create Network Adapter scriptable task and End element and call them Task X, Task Y and Task Z accordingly. Make sure you bind errorCode as the exception variable across 3 scriptable tasks and also, hover over and drag red arrow to Throw element.

Screenshot 2015-06-16 13.42.03


Screenshot 2015-06-16 13.42.11

Screenshot 2015-06-16 13.41.20

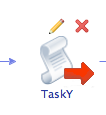
When task X,Y or Z fails, we want to delete the network adapter created. To do this, simply drag and drop a scriptable task between Task X and the Throw element and call it Remove Network Adapter:

Screenshot 2015-06-16 13.43.54

The problem in the above screenshot is that when the Task Y fails, it will just throw an exception without failing back. It will go directly to the Throw exception element. To correct it, click on the red line between the task Y and the Throw exception element, press delete and re-join it to Remove Network Adapter task. Repeat it to Task Z and the final state will look like the following:

Screenshot 2015-06-16 13.45.08

Paste the following script into Remove Network Adapter scriptable task:

try {
    System.error("An error has occurred, removing the created network adapter: " + attrDevice);

    var deviceConfigSpec = new VcVirtualDeviceConfigSpec();
    deviceConfigSpec.device = attrDevice;
    deviceConfigSpec.operation = VcVirtualDeviceConfigSpecOperation.remove;

    var configSpec = new VcVirtualMachineConfigSpec();

    var configSpecArray = new Array();
    configSpecArray.push(deviceConfigSpec);

    configSpec.deviceChange = configSpecArray;

    Task = VM.reconfigVM_Task(configSpec);
} catch (e) {
    errorCode = e;
    throw errorCode;
}

And also, finish off the Visual Binding:

In

Screenshot 2015-06-16 13.46.54

Out

Screenshot 2015-06-16 13.47.34

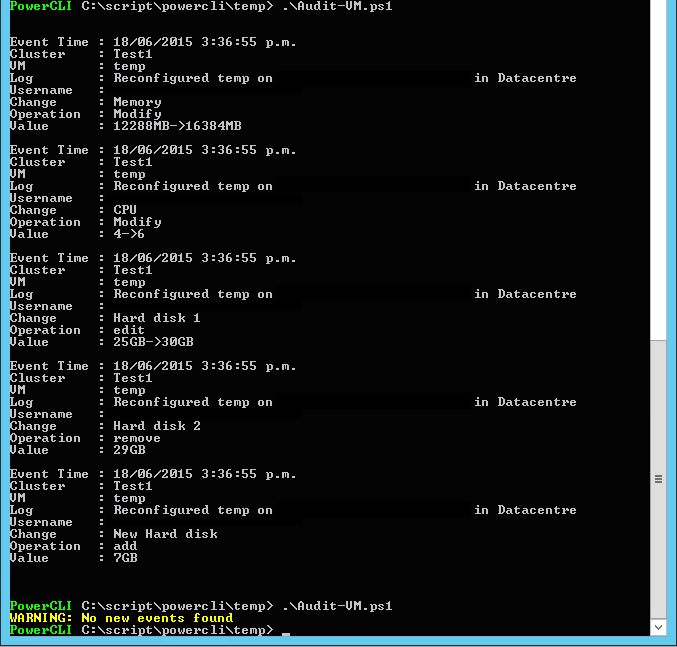
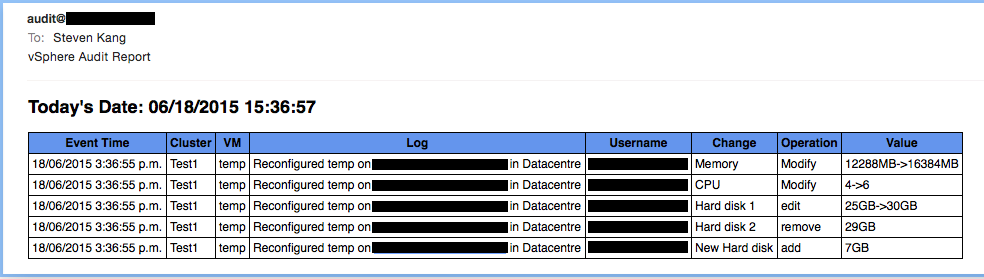
All done, let’s run and see the fail-back works. The following depicts the virtual machine has two network adapters, VLAN444 and VLAN1153:

Screenshot 2015-06-16 15.17.26

Let’s intentionally throw an exception in Task Y. Do the Visual Binding for errorCode and type the following in the scripting field:

errorCode = "This is intentional";
System.error(errorCode);
throw errorCode;

Let’s run it!

Screenshot 2015-06-16 15.20.41

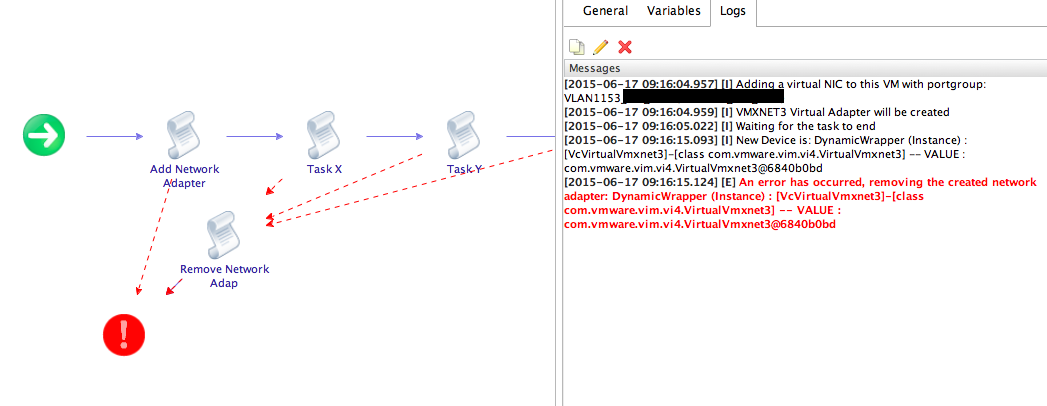
It has thrown an exception at the Task Y and looking at how many network adapters the virtual machine has, you will see that the network adapter wasn’t created. Fail-back was successful!

Screenshot 2015-06-16 15.21.50

Wrap-Up

Hope this blog post was helpful and as always, feel free to contact me for any clarifications or help.

The next series will cover “Introduction to Relationship Between vRO & vRA” which is a big topic, stay tuned! 😀

Advertisement

PowerCLI Report – Audit Your Environment

Introduction

I’ve been working on producing a daily report to audit who’s been modifying compute resources and while looking for some resources, found a great blog by Luc Dekens (@LucD22). However, one of the problems was that neither events or tasks keep original values, only retain new values.

In this blog post, instead of going through the script line by line, I would rather go through what I’ve done to overcome this constraint.

Mechanism

Initially, I thought about deploying a database (MySQL or MSSQL or whatever…) to store the compute resource data, i.e. CPU, memory and hard disk(s). But it wasn’t a good idea as it introduces another management layer. After a few minutes, one thing popped up in my head that how about using a .csv file to store the data? Did a quick brainstorm and came up with the following:

  1. For the first run, get the list of VM, CPU, memory, hard disks and capacity and export the list as a .csv file (I will call vm_report.csv from now on).
  2. For the second run and so on, for each event, generate an array to contain what has been modified by comparing the new value to old value from the .csv file. For instance, CPU 1->2.
  3. Once the for loop against events is finished, send an email to administrators for review.
  4. Export the new list to overwrite vm_report.csv.

Finished writing a script and started testing. One thing I found is that the script ran for the second time with no issues but for the third time, it failed. Well, it was obvious as the vm_report.csv was already up-to-date and I was trying to get the comparison where there will be none!

I was looking at the event object closely and figured out that each event has a unique element called key. Which means, if I can somehow filter the events out using the keys, there will be no overlap.

Eventually, I generated another .csv file called vm_events_keys.csv with the list of keys. Before the script queries the event information, it first looks at whether the vm_events_keys.csv contains the event key. If there is, it means it’s already been queried before so it could be ignored. Otherwise it’s a new event.

In summary:

  1. Get the list of information and save it in vm_report.csv.
  2. Get the list of keys of events and save it in vm_events_keys.csv.
  3. For each event, ensure vm_events_keys.csv does not contain the key of the event. If the event is a new one, generate report
  4. If there are new events, update vm_report.csv and vm_events_keys.csv. Otherwise do nothing.
  5. Send an email with report to administrators for review.

Before I move on to walk through, some people might ask about the period of events the script queries for, i.e. begin time and end time. Let me make it simple. Literally, the script looks for the time between the users execute the script. For example, if you ran the script at 7pm and then run it again at 10pm, the period will be 3 hours. Then after 24 hours you run the script, it will query for 24 hours of events.

Time for walk through!

Walk Through

In this walk through, I will be running the script for the three times.

The screenshot below shows you it was the first time running the script. It outputs a several warnings saying there are no .csv files as well as no new events:

1

The following screenshot is after the vm_report.csv and vm_events_keys.csv were generated. For the second run, it shows you a nice report showing what’s been changed as well as old values and new values.

The last run produces a warning saying “No new events found” and the reason is simple, I already ran it before and the vm_keys_events.csv is updated!

2

Looking at the inbox, I also got the result in a table format:

3

Script

The following is the script written. Did minimal comments, feel free to leave a reply if you need any clarifications.

## report function that outputs the result
function report {
    param ($event, $change, $operation, $value)
    return $event | Select @{N="Event Time";E={[datetime]($_.CreatedTime).addHours(12)}}, @{N="Cluster";E={$_.ComputeResource.Name}}, @{N="VM";E={$_.VM.Name}}, @{N="Log";E={$_.FullFormattedMessage}}, @{N="Username";E={$_.UserName}}, @{N="Change";E={$change}}, @{N="Operation";E={$operation}}, @{N="Value";E={$value}}
}

## update_report function that updates the vm_report .csv file
function update_report {
    param($vm_report, $vm, $change, $operation, $value)
    
    switch (([string]$operation).ToLower()) {        
        add {
            $harddisk = $vm | %{ [String]::Join(":", ($_.HardDisks.ExtensionData.DeviceInfo.Label)) }
            $harddisk_capacity = $vm | %{ [String]::Join(":", ( ($_.HardDisks.ExtensionData.DeviceInfo.Summary -replace " KB"))) }
            
            ($vm_report | where {$_.Name -eq $vm.Name})."Hard Disk" = $harddisk
            ($vm_report | where {$_.Name -eq $vm.Name})."Capacity" = $harddisk_capacity
            
            break
        }
        
        remove {     
            $harddisk = $vm | %{ [String]::Join(":", ($_.HardDisks.ExtensionData.DeviceInfo.Label)) }
            $harddisk_capacity = $vm | %{ [String]::Join(":", ( ($_.HardDisks.ExtensionData.DeviceInfo.Summary -replace " KB"))) }
            
            ($vm_report | where {$_.Name -eq $vm.Name})."Hard Disk" = $harddisk
            ($vm_report | where {$_.Name -eq $vm.Name})."Capacity" = $harddisk_capacity
            
            break
        }
        
        edit { 
            ($vm_report | where {$_.Name -eq $vm.Name})."Capacity" = $value
            break
        }
        
        modify {
            if ($change -eq 'Memory') {
                ($vm_report | where {$_.Name -eq $vm.Name}).MemoryGB = $value
            } elseif ($change -eq 'CPU') {
                ($vm_report | where {$_.Name -eq $vm.Name}).CPU = $value
            }
            break
        }
        
        default { 
            break
        }
    }
    return $vm_report
}

## send_email function that sends the final result to the end user
function send_email {
    param ($event_report, $today)

    $header = @"
<style>
TABLE {border-width: 1px;border-style: solid;border-color: black;border-collapse: collapse;}
TH {border-width: 1px;padding: 3px;border-style: solid;border-color: black;background-color: #6495ED;}
TD {border-width: 1px;padding: 3px;border-style: solid;border-color: black;}
</style>
"@

    $body = "<h2>Today's Date: " + $today + "</h2>"
    
    if (!$event_report) {
        $body += "There are no new events"
    } else {
        $body += $event_report | Sort "Event Time" | ConvertTo-HTML -Head $header | Out-String
    }
    Send-MailMessage -From "Email Sender Address" -To "Email Receiver Address" -Subject "vSphere Audit Report" -BodyasHtml -Body $body -SmtpServer "SMTP Server"
}

## List of administrator users you would like to exclude. For example, exclude yourself as you know you have the right to modify
$admins = "com.vmware.vadm|administrator|YourAccount"

## Check for vm_report.csv & vm_events_keys.csv files and if they don't exist, generate one
if (Test-Path "vm_report.csv") {
    $vm_report = Import-Csv "vm_report.csv"
} else {
    $vm_report = Get-VM | Sort Name | Select Name, @{N="CPU";E={$_.NumCpu}}, 
    MemoryGB, 
    @{N="Hard Disk";E={[String]::Join(":", ($_.HardDisks.ExtensionData.DeviceInfo.Label))}}, 
    @{N="Capacity";E={[String]::Join(":", ( ($_.HardDisks.ExtensionData.DeviceInfo.Summary -replace " KB")))}}
    
    $vm_report | Export-CSV -UseCulture -NoTypeInformation "vm_report.csv"
    Write-Warning "No vm_report.csv found therefore, exported a new list. Run it again after at least one event occurs"
}

if (Test-Path "vm_events_keys.csv") {
    $events_keys = Import-Csv "vm_events_keys.csv"
} else {
    $events_keys = @{"Key" = ""}
    Write-Warning "No vm_events_keys.csv found, starting with an empty array"
}

## Create vCenter API object, EventManager
$event_manager = Get-View EventManager
$event_filter_spec = New-Object VMware.Vim.EventFilterSpec
$event_filter_spec.Type = "VmReconfiguredEvent"

$event_filter_spec.Type = "VmReconfiguredEvent"
$event_filter_spec.Time = New-Object VMware.Vim.EventFilterSpecByTime

## Define the Event Filter. 
## Start date is based on the last modified date of the vm_report.csv file.
## End date is now
$last_modified = (Get-Item vm_report.csv) | %{$_.LastWriteTime}
$today = Get-Date
$hour_difference = -($today - $last_modified).TotalDays

$event_filter_spec.Time.BeginTime = (Get-Date).AddDays($hour_difference)
$event_filter_spec.Time.EndTime = (Get-Date)

## Query events with the Event Filter defined above
$events = $event_manager.QueryEvents($event_filter_spec) | where {$_.Username -notmatch $admins} | Sort CreatedTime

## For each event, see if the event key is found in $vm_events_keys list
## If found, then skip it otherwise save the result to $event_report array
$event_report = foreach ($event in $events) {
  $event | Foreach-Object {        
        if (!(($events_keys | %{$_.Key}).Contains([string]($_.Key)))) {
            $vm = Get-VM -Name $_.VM.Name    
            if ($vm -and ($vm_report | where {$_.Name -eq $vm.Name})) {
                
                ## Memory modified
                if ($_.ConfigSpec.MemoryMB) { 
                    $change = "Memory"
                    $operation = "Modify"
                    $new_value = $_.ConfigSpec.MemoryMB    
                    $old_value = [int]($vm_report | where {$_.Name -eq $vm.Name} | %{$_.MemoryGB}) * 1024
                    
                    $value = [string]$old_value + 'MB->' + [string]$new_value + 'MB'
                    if ($new_value -ne $old_value) {
                        ## Update $vm_report array
                        $vm_report = update_report $vm_report $vm $change $operation ($new_value / 1024)
                        ## Save the change to $event_report array
                        report $event $change $operation $value
                    }
                }
                
                ## CPU modified
                if ($_.ConfigSpec.NumCPUs) {
                    $change = "CPU"
                    $operation = "Modify"
                    $new_value = $_.ConfigSpec.NumCPUs
                    $old_value = [int]($vm_report | where {$_.Name -eq $vm.Name} | %{$_.CPU})            
                    $value = [string]$old_value + '->' + [string]$new_value
                    if ($new_value -ne $old_value) {
                        $vm_report = update_report $vm_report $vm $change $operation $new_value
                        report $event $change $operation $value
                    }
                } 
                
                ## Hard Disk modified
                if ($_.ConfigSpec.DeviceChange) {
                    ## Use Foreach-Object as there might be more than 1 hard disk changes
                    $_.ConfigSpec.DeviceChange | where { [string]$_.Device -eq "VMware.Vim.VirtualDisk" } | Foreach-Object {
                        if ($_.Device.DeviceInfo.Label) {
                            $change = $_.Device.DeviceInfo.Label
                            $operation = $_.Operation
                            $new_value = $_.Device.CapacityInKB / 1024 / 1024
                            $harddisk = ($vm_report | where {$_.Name -eq $vm.Name} | %{$_."Hard Disk"}) -split ":"
                            $harddisk_capacity = ($vm_report | where {$_.Name -eq $vm.Name} | %{$_."Capacity"}) -split ":"            
                            
                            for ($i = 0; $i -lt $harddisk.length; $i++) {
                                if ($harddisk[$i] -eq $change) {
                                    $old_value = [int]$harddisk_capacity[$i] / 1024 / 1024
                                    $harddisk_capacity[$i] = ("{0:N0}" -f ($new_value * 1024 * 1024))
                                }
                            }                        
                            ## If the operation is not Remove, i.e. Edit
                            if ($operation -ne 'remove') {
                                if ($new_value -ne $old_value) {
                                    $value = [string]$old_value + 'GB->' + [string]$new_value + 'GB'
                                    $vm_report = update_report $vm_report $vm $change $operation ([string]::Join(":", ($harddisk_capacity)))
                                }
                            ## If the operation is Remove
                            } else {
                                $value = [string]$old_value + 'GB'                            
                                $vm_report = update_report $vm_report $vm $change $operation ""
                            }
                            ## Save the output to $event_report
                            report $event $change $operation $value        
                            
                        ## If there is no device label, it means there is a new hard disk
                        } else {
                            $change = "New Hard disk"
                            $operation = $_.Operation
                            $value = $_.Device.CapacityInKB / 1024 / 1024
                            $vm_report = update_report $vm_report $vm $change $operation ""
                            report $event $change $operation ([string]($value) + "GB")                        
                        }
                    }
                }
            }
            
            ## Reset parameters after 1 loop
            $change = '';
            $operation = '';
            $old_value = '';
            $new_value = '';
            $value = '';
        }
    }
}

## If there are no events, send an email with an empty result
if (!$event_report) {
    Write-Warning "No new events found"
    send_email "" $today
## If there are events found, update vm_events_keys.csv to prevent duplicate check
## Update vm_report.csv to ensure the data is up-to-date
## Send an email to the administrators with the changes
} else {
    $event_report
    $events | Select Key | Export-Csv -UseCulture -NoTypeInformation "vm_events_keys.csv"
    $vm_report | Export-Csv -UseCulture -NoTypeInformation -Force -Path "vm_report.csv"
    send_email $event_report $today
}

Hope this helps!

vRA – Get Reservation Policy ID from vRO

Introduction

I’ve been dealing with Reservations & Reservation Policies on vRA and found out that instead of using a SQL query, it was able to use vRO to pull Reservation Policy ID information out. In this blog post, I will go through both ways and explain the difference.

If you aren’t familiar with Reservation Policy ID, read the excellent blog by Kushmaro.

SQL Query

The following is the SQL query you could use in order to pull Reservation Policy ID out:

SELECT [id],[name] FROM [vCAC].[dbo].[HostReservationPolicy]

Login to SQL Management Studio and run the query above. If you don’t have access, ask database administrator to run it and get the output for you.

The attached screenshot below is a sample output:

5

It was quite easy, wasn’t it? Let’s take a look at vRO query.

vRO Query

It’s fairly simple to use vRO to query Reservation Policy ID. First of all, create a workflow and attach two attributes as the following:

6

For Reservation values, expand Reservations folder and add Reservations you would like to:

1

For vCACHost, select the vRA server.

Now, click on the Schema tab and drag and drop a scriptable task between start and end:

7

Edit the scriptable task and finish the Visual Binding like the below:

8

Navigate to Scripting tab and paste the script:

for each (var r in Reservation) {
  var reservationPolicyId = r.getEntity().getLink(vCACHost, "HostReservationPolicy");
  for each (var p in reservationPolicyId) {
    System.log("***********************************************");
    System.log("Reservation Policy Name is: ");
    System.log(p.getProperty('name'));
    System.log("Reservation Policy ID is: ");
    System.log(p.getProperty('id'));
    System.log("***********************************************");
  }
}

Run the workflow and a sample output is shown below:

4

Comparing both outputs from SQL and vRO, it seems different. There are 5 Reservation Policies from SQL whereas 3 from vRO. Why is this?

Difference

Let us first take a look at how many Reservation & Reservation Policies are there in the vRA environment I am connected to:

10

9

Even though there are 5 Reservation Policies, it does not mean that Reservations use all of them. In this case there are 3 Reservations and they are using only 2 Reservation Policies.

In summary, if you do a SQL query, it will show you Reservation Policy IDs across all Reservation Policies whereas vRO will only return you the ones being used by Reservations.

Hope this was useful and feel free to leave a comment for any clarifications.